Saturday, September 30, 2006

Gabriel, Take it away!

Well, I decided to do some video editing recently. After a couple days of thinking and throwing around songs and movies, and videos, and games and just about everything else, I decided to do a Dawn of War video. So I pulled out my D.o.W Cds and started playing the game this time with a copy of FRAPS running the background. For anyone who doesn't know what FRAPS is, it is a program that allows you to "record" game footage onto your hard drive. Using this program allowed me to get the footage I needed to actually make the video.
Initailly I was leaning toward doing the video to "Let the Bodies hit the floor", but there just wasn't any challange to it. So I decided on a more theatrical approach and basically did a Pro-gabriel video to Breaking Bejamin's "Blow me Away". And with out futher delay, enjoy....


Wednesday, September 20, 2006

Black Knight? White Knight? Grey Knight?

Once again a random creation of my boredom. I tried a couple tricks with this fellow. First was the left arm. The power fist is actually a spare power fist from the Space marine Commander sprue. So that needed it to be pinned in place and likewise for its shoulder. And then I needed to build in the joint with some green stuff. Pretty standard stuff really. The next step: The wrist mounted storm bolter!
I took an extra storm bolter from a dread sprue, and that was where the challenge started. First thing I did was cut the belt feed from the ammo clip. Then I cut the ammo clip from the bolter housing. I took the ammo clip and turned it so that it now faced out and away from the bolter housing, as opposed to up and behind in it’s original orientation. I then took the ammo belt and cut it into three segments. The first segment was the initial bend that would come directly out of the Storm bolter. The second was a single ammo joint that I need was going to be the main point of contortion. The third segment contained the remaining links. Using a small pin vise drill, I drilled a hole the three segments and then passed a piece of florist wire through them. I them glued the wire connected segments to the ammo clip on the storm bolter. Using a pair of make up tweezers I then directed the ammo feed up along the arm and under the shoulder guard. I then glued the feed in place. I used green stuff to fill in the gaps in the feed.
The next point of conversion on this model is the right shin guard (I know you can’t see it. Pictures will come). I attempted to emulate the Grey Knight iconography on the shin of this model. By carving out a depression about 2 centimeters deep, I gave myself a hard lined place to work with in. I filled the depression with green stuff and used the bladed end of my sculpting tool to etch out resemblance of letters in the green stuff. I met with limited success. The green stuff tends to overflow when pressed with the blade, and when I tried to shave the over flow off, it tended to pull the entire strip out of place. I think it may have had to do with the consistency of the green stuff. Next time I think I will use a 25/75 mix of blue and yellow.
The last major point of conversion is the force/power weapon. Built out of a Thunder hammer arm, I chopped off the hammer head, and attached the blade of a company champion. To extend the hilt some, I attached the shaft of a Grey Knight’s force halberd I had sitting in my bitz box.
Lastly were the power cables running from the thunder hammer connection to under the shoulder guard (I Know I know, the shoulders do NOT supply ammo and power. Next time I’ll run the power cables to the back of the Armor)

Monday, September 18, 2006

Everything Old is new agian, agian


This was the second terminator to come out of the efforts of converting the old Terminator models. The first thing I wanted to do was change the angle of the head. No small task given the head is part of the front of the torso. I took one of my smaller drill bits and used it to “cut” out the head. Basically, I drilled several holes under the neck of the helmet and cut until I could remove the head piece. Once the head was removed, I glued the front torso plate to the back. By rotating the head to the right, I could make it look as if the warriors were turning his head to aim at some distant target. I pinned a straight aiming storm bolter arm to appear as if it was what was being aimed along. I then rebuilt the shoulder joint a bit to make it look raised. For the left arm, I wanted to mount a chain fist. But I didn’t have any, so I decided to make one. I really thought the old style Terminator power fist looked rather chunky. So I opted to craft a chain fist out of a spare power fist. I dug up a Chaos Power fist, the one with the pointy fingers, and chopped off the elbow of it. I then attached the blade of a space marine chain sword to the underside of the fist. Presto, one really mean looking chain fist.
In homage to the Terminator’s origin in the game of Space Hulk, I took a deck plate piece from the battle field wreckage sprue and used that as a base for the Termie. I then bent it upward from the front middle slightly and glued a ripper coming out from under the plate. I then sawed part way through the ripper’s jaw and tore it a bit more to make it look like the ripper was about to jump the Termie, but the Termie was too well seasoned to be taken so easily and racked the chain fist through the ripper’s mouth.

Sunday, September 17, 2006

Everything old is new agian...

About a year ago I bought a friend’s then discarded space marine army. Among the army were several of the old style plastic termies. The new Terminators had just recently been released, and I was filled with an urge to modify. So I took out my tools and began to break down the Termie models. This is the first one to walk out of that experience. Relatively light in terms of conversions. I repositioned the torso so that he was facing to the left of where the legs were facing. It gave the Terminator a bit more of a dynamic pose. From there I elevated the left arm at the shoulder, pinned it up and rebuilt the join with a bit of green stuff.

The other arm was a storm bolter arm, but I wanted to give this Termie a heavy flamer (mostly because I had the extra bit rumbling around from building 9 Tornadoes). So a bit of shaving and I removed the storm bolter, and then glued the heavy flamer to the bottom of the arm. I used a bit of green stuff to built up from armor plating to make it look like it was actually being held by something, other then good charms, to the underside of the arm. In order to hide the lack of a fire control mechanism, I took a space marine shoulder pad and shaved out one side of it. I glued it to the Heavy flamer body, just ahead of where the hand sat to make it look like a hand guard.

Friday, September 15, 2006

Grey Knight Commander

This figure was originally a prototype for my space marine commander. I knew I wanted my commander to have armor on the level of terminator armor, but not be terminator armor. So I gave him artificer armor and an iron halo, 2+ regular 4+ invulnerable save. Thinking I could adapt the Terminator armor from a Grey night model to be this “Other” type of armor, I started by grinding out of the head of a GK Terminator. Since my commander wasn’t going to have a Psychic hood, I cut that off of the model. My intension was to grind out a base large enough to accommodate the half bionic head from the plastic space marine range. I ground out a space for the head, I glued the head into place.
The body had only minimal work done to it. Mostly this involved cutting the cloaks off of two Space marine Commander backs and grafting them to the GK body in a resemblance of robs. I tried to make it look like one was a open robe while the other was basically an over throw that would hang off the shoulders. I used a bit of green stuff to fill in the rest of the material for the rob and cloak. I attached one of the ribbon pieces from the Space marine commander, again to help remove the “Grey Knightliness” of the model. I then glued a space marine backpack with the Iron Halo on to the back.
The real conversion work was in the arms. The right was to hold a master crafted plasma pistol, or rather twin-linked. That innovation was achieved by shaving down the conjoining sides of a pair of plasma pistols. I used a bit of green stuff to fill in the coils section and the sight mount so it made look more like a single weapon and not two glued together. I glued a scope to the now combined scope mounts between the two pistol bodies. To further enhance the “non-standard” look of the plasma pistol, I attached a length of guitar wire running from the pistol grip to back under the commander’s cloak and attaching to the power plant in the back pack.
The Left arm was a fairly simple conversion. I took an arm from a company champion, removed the sword and attached the sword from the Captain Stern model. After I finished the arms. The only thing left to do were the shoulder pads. I wanted them to look different, so I took the shoulder pads, and turned them out foot ball player style and cut off the outer hoods. So now they were basically armored strips that ran over the shoulder.
However, even with all the modification and alteration I threw at the model, the final result was still most definatly Grey Knight. Unable to bring myself to throw the model away I painted it up in the current paint scheme and used him as the lord of my Daemon Hunters for a while before I retired the force.

Thursday, September 14, 2006

Blood angle assault lord?


I'll be honest, this guy was meant to be nothing more then a random use of bits and some experimentation with making the longer purity seals.
It turned into a bit more as I quite literally had to built a set of legs to get what you see there. Separating Foot from lower leg, lower leg from upper leg and upper leg from hips was quite a new challenge. In the end though, I enjoyed the work and I gained valuable knowledge. Point in case: Cut out ALL of the joint section. Don't try this "If I leave that piece, I won't need to re-sculpt it" idea. It just makes it more difficult.
Like the champion with the thunder hammer, the purity seals are made in two parts. The first part, the wax seal, is nothing but a bit of green stuff that's been pressed into a disk with the end of my largest model drill bit. The parchment, is simply strips of paper. I kept the paper strait this time for a couple of reasons. One was because the seals would be easier to handle with the more rigid strips of paper. Two was the flowing of the strips I wanted to make. One I glued the purity seals in place, It was a matter of going back around the model with make up tweezers, and enticing the parchment to wrap about the marine's body.
Lastly, the wings. These seemed like a simple enough concept when I started them. Remove the exhaust vents from the pack, pin on the wings, fill in with green stuff. Little did I realize, the wings from the Classic Wood Elf eagle have a mounting pin that is about 3/4 as thick as the top of the Space Marine back pack. This created the issue of keeping the wings secure and steady while the glue dried. As you can see, I had only some limited success in that regard. As well, food for future endeavors. I'm working on designing a mounting bracket of some sort that will be adaptable enough to accommodate this project if I were perform it again in the future. Some sort of multi-armature device with flat based claws. Maybe alligator clips with bent in teeth and electrical tape to keep from scaring the plastic.

Friday, September 08, 2006

HUZAN ....smash?

Once more into the bitz boxes dear friends. Here is my latest creations of randomness and boredom: This fellow is what will probably be a commander of some sort. With a storm shield and Thunder hammer I can see him running up to a greater daemon and going "Luciee! You gots shomes ex-plaining to do!" This model was a experiment for a couple of things. Firstly, it's the first time I've combined assault terminator pieces with regular marines. Surprisingly, the pieces fit very closely with only minimal modification needed. The inner wrists of the hands holding the thunder hammer and the shield each have a wedge shaped nub used for alignment with the Terminator arms. Since the regular space marine arms have no matching groove the alignment nub had to go. Once that was gone, they fit right onto the regular marine arms.
The second thing, that was a new experience for me, were the purity seals. Usually I use the prefab plastic and resin ones I have in abundance. This was the first time I tried making my own. They are surprisingly simple to craft. A pin-head sided piece of green stuff, pressed down by the head of a large modeling drill bit and presto, you've got a wax seal. The trips of parchment are nothing more then regular loose leaf paper cut into strips. A little super glue, a little pain after I realized I attached the purity seal to my finger tip, a little more super glue, some zip-kick and pop, the seals are on. The Third thing that was new for me on this model were the power cables running from the backpack to the thunder hammer. I've modeled detail (a little) onto pre-existing pieces before but this was the first time I'd ever tried to build a new piece from green stuff. The procedure is quite simple one you realize it. Roll out the cables separately first. Let them cure for about half an hour or so, just enough so that they won't pick up your finger prints. Then roll the cables up and bundle them together with small pieces of green stuff. A little smoothing and there ya go. You've got some power cables that are ready to work.

Thursday, September 07, 2006

I died for the Emperor (Continued)


The legs of the dreadnought are actually from the throne of judgment. I liked the walking stance those legs had and it kept me from having to alter another set of legs to get the same appearance. Taking a queue from Forgeworld, I used the feet from the penitent engine instead of regular dread feet. I like the "archaic" look of these feet over the stomping lids the regular dread feet look like. The right shin guard is the front fairing from the Chaplin space marine bike. I simply cut out the connecting struts from between the skull emblem and thins wings and glued them to the pistons of the leg to suggest motion and that the pieces were in fact separate pieces that moved as the dread walked. The large tabard on the left shin came from the Sisters of battle immolator sprue and attached easily enough with some Super glue. The power fist proved to be of little inspiration and relatively little work was done to it. Continuing with lining the armor I lined the shoulder and the wrist. To add to the Venerability of the dreadnought, I attached a pair of parchment scroll to the outside of the shoulder and affixed a series of thee striped of plasticard under the joint. I then topped off these stripes with skulls from the Chaos Warriors sprue. Atop the inner shoulders I adorned with additional pieces. On the left I placed trophies, once more in the form of skulls taken from the Chaos Warriors sprue. On the right I built in a targeting matrix formed out of several scopes from the space marine sprues. The base is a 60mm flat base. Built up with a piece of flooring from the City of Death sprue, it provides a fantastic base for the dreadnought to stand on, and it helps balance the bloody thing since the legs are built with one leg lifting. I built on the back wall and the crushed side wall to help define the model a bit more. Discovering a package of spare servo skull floating in my bitz box (no pun intended) I cut out some lengths of wire, drilled out holes in the servo skulls and glued them onto the supports. I then attached the other end of the wire to the base in various places and bent the wire to show the servo skulls floating here and there almost aimlessly.

I died for the Emperor...

Well, a couple months back I saw the preview shots of the then up-coming Venerable Dreadnought for the Space marines. I wasn't particularly thrilled with it. So I set about to craft my own Ven-dread. After much research, testing, carving, cutting, replacing, deciding, bending, heating, removing, and bandages here is the outcome:
Built around the torso of a Blood Angles Furioso dread, I started by adding embellishment in the form of Plasticard strips that line the armor plating of the torso. Peice of advice: Plasticard bonds to Super glue VERY quickly! So test fit, test fit, TEST FIT!!!!! To keep the dread appearing wise and, well venerable, I added lots of additional pieces in the forms of purity seals, sacred scrolls, and banners in addition to additional marine Iconography.

The assault cannon I found on a discarded Dread sprue. Once again I added embellishment by lining the armor plating of it with plisticard. Under the barrels I hung a banner which I intend to write litanies of service on at some future date (When ever I get around to painting this guy that is)
I used the power-plant from the throne of Judgment due to it's more archaic look (Plus I like the four exhaust ports). Additional pieces I used from the Throne of Judgment include the banner poles atop the torso. A note about the banner poles: I realize this in hind sight and it is my fondest hope that you will learn from my errors. The banner pole on the left, the one with the banner mostly off the pole itself, is extremely bendable. In hind sight, I would have cut out the original pole and replaced with brass tubing as tubing is more resistant to bending then pewter. I would also have cut out guide grooves in the back of the torso to line the banner poles up correctly. As they sit now, they are glued into the L formed from the power plant and the torso. It seemed fine in theory, but in practice the Throne of Judgment’s power plant does not line up with the Dreadnought torso correctly giving a slightly cock-eyed alignment.

I hate Salamanders....

Here are the two reasons why I have decided to never do a Salamanders Space Marine army:
Master:>>>>>>>>>>>>>>>>>>>>>>>> Captian:


While I am certainly pleased with how these models turned out, allow me to illustrate why they have helped me to decide never to do an army of them (Kill team maybe, NOT an army)

The ammount of green stuff work on these two models is substantially higher then any previous conversion I have done. I have learned I have a great deal of difficulty working with green stuff. Not due to the skill of using it, I am learning those skills the more and more I work with it. The problem is patiance. I utterly despise waiting around for the paint to dry (Or green stuff to cure).

Wednesday, September 06, 2006

Evolution of concept


Any of you who know my work in real life, know I seem to have some sort of Flamer thing going on. Despite the fact that I rarely use flamers in my armies I seem to have some pre-written peice of genetic code that drives me convert the ubiquitous weapon.
Well, I was reorganizing my models and ran across these two figures. Both of these marines are the results of random bitz box diving and two compleatly seperate days. Just kinda bizarre peice of work I guess.

Monday, September 04, 2006

Bitz Box Diving!

Ah the ever favorite past time of Bitz Box diving. It great when you're bored, fantastic when you need to fill a saturday, and outstanding when you need to reduce the number of bitz you have flying around. I also found it's a great chance to expirement and learn new tricks and techniques for modeling.
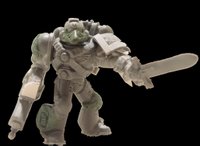
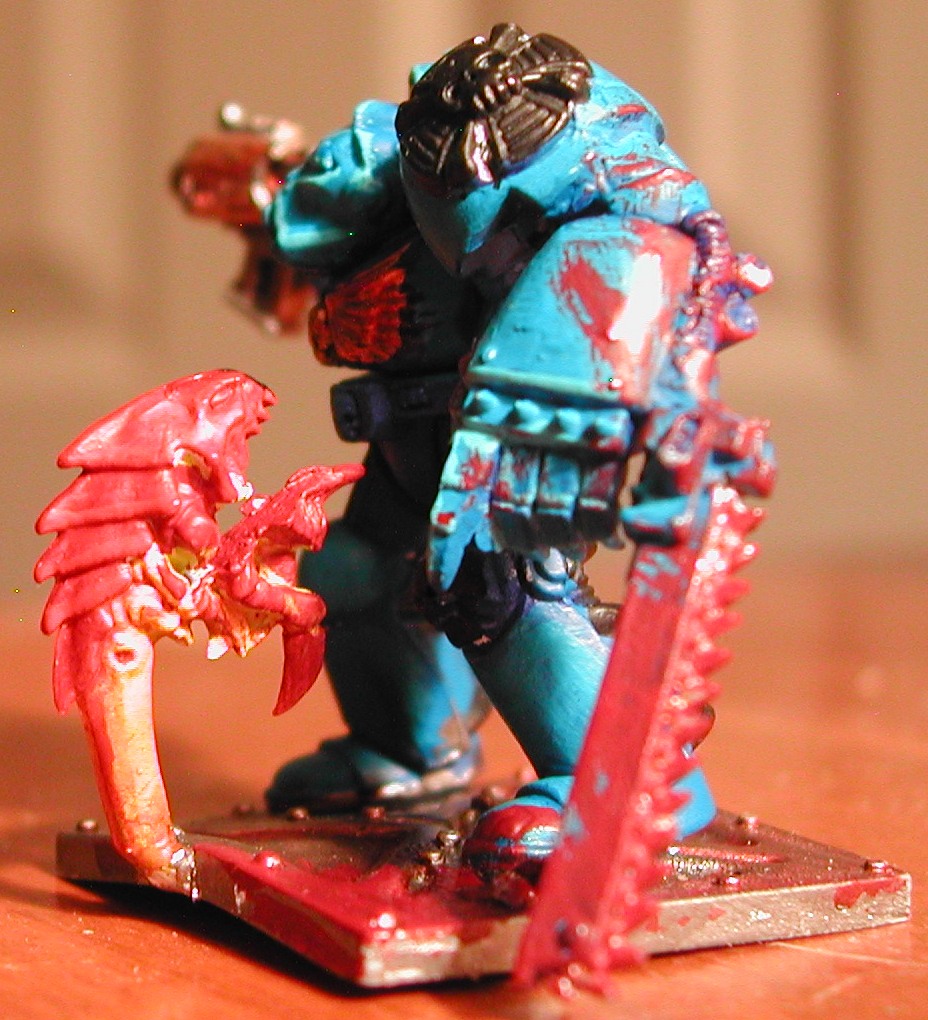
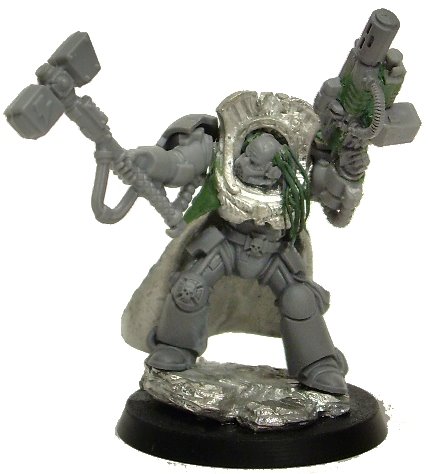
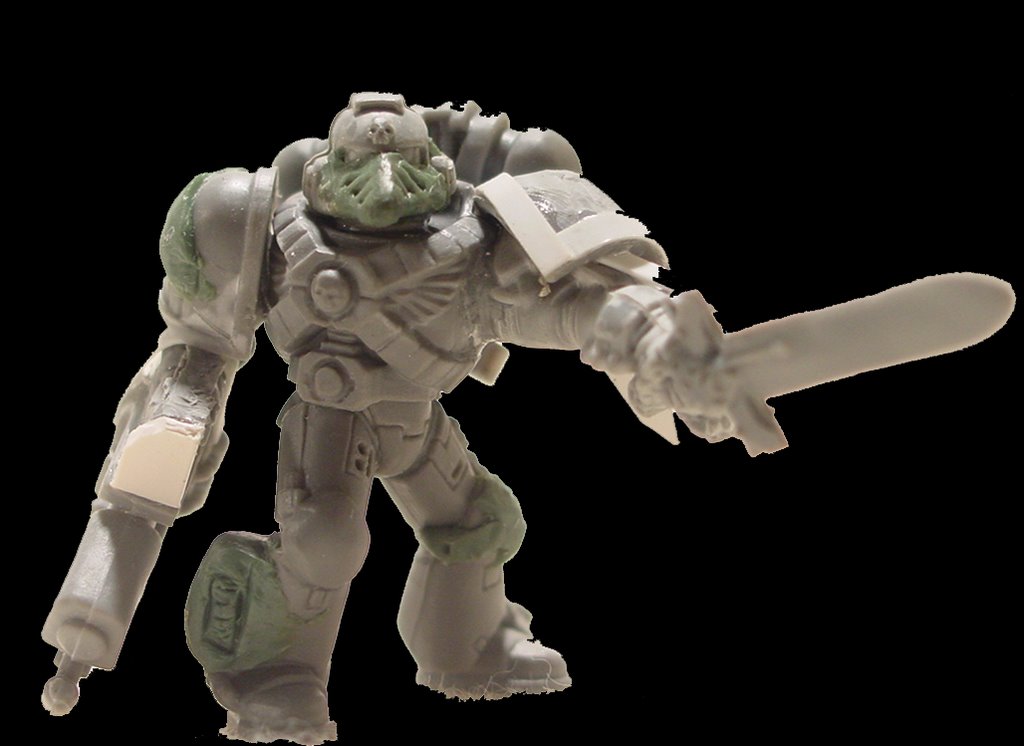
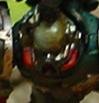
Here's the first of my expiriments on this particular bitz box dive. A standard marine legs, with an assault marine torso. The sword arm from the Black Templars sprue and a pistol arm from the assault sprue make up the basic body. It also where the basics end. Using green stuff I made a resemblense to mark 4 armor with a pointed respirator nose cone. Attached to the pistol arm is a heavy flamer from the dreadnought sprue. TO make it look a bit more man portable then simply gluing it in place, I built a hand guard with a bit of plasticard.
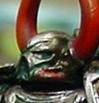
Instead of a normal shoulder pad o nthe left shoulder, I used a terminator shoulder pad. I tried cutting strips of plasticard to hand out from under the pad it self. On the right shoulder, I used a flat pad and molded a wing-style icon with a bit of green stuff.
On the legs I tried my hand at a few peices of sculpting. On the left knee pad I sculpted a templar-esqu cross. On the right shin, I tried to sculpt a sort of vent on the side. I had some limited success. Well, for a first try it's not too bad I guess.

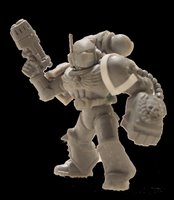
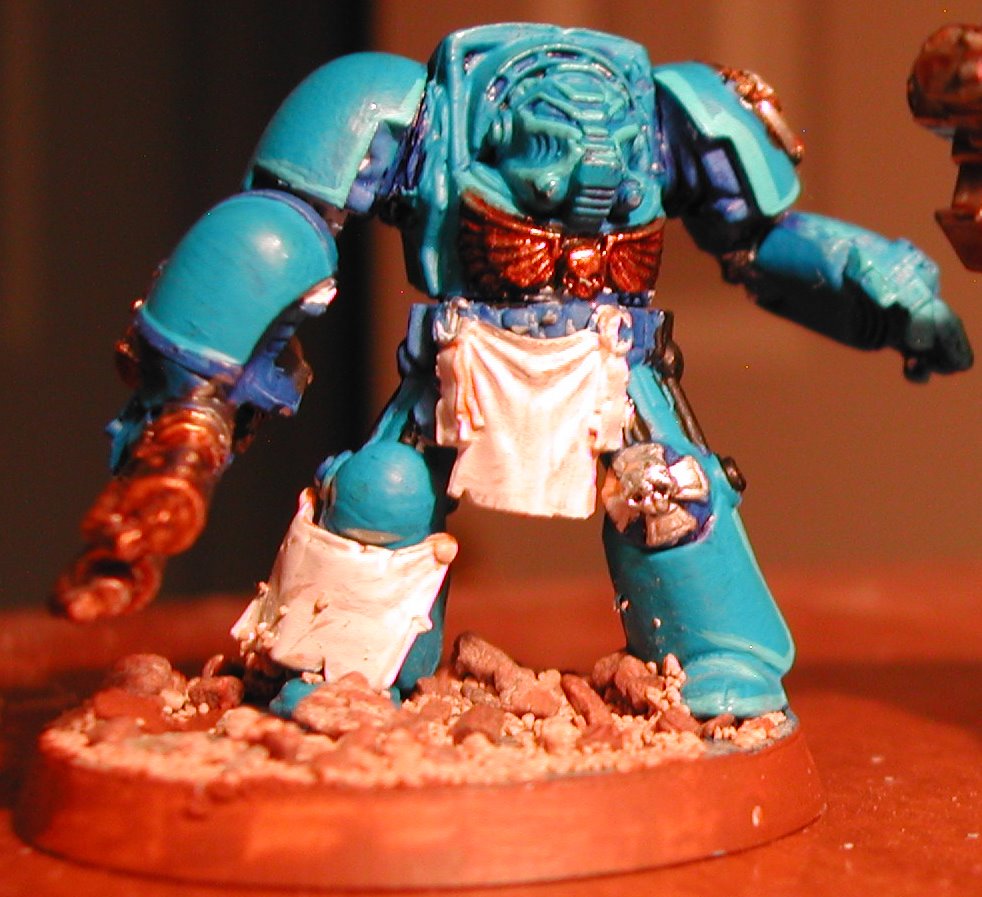
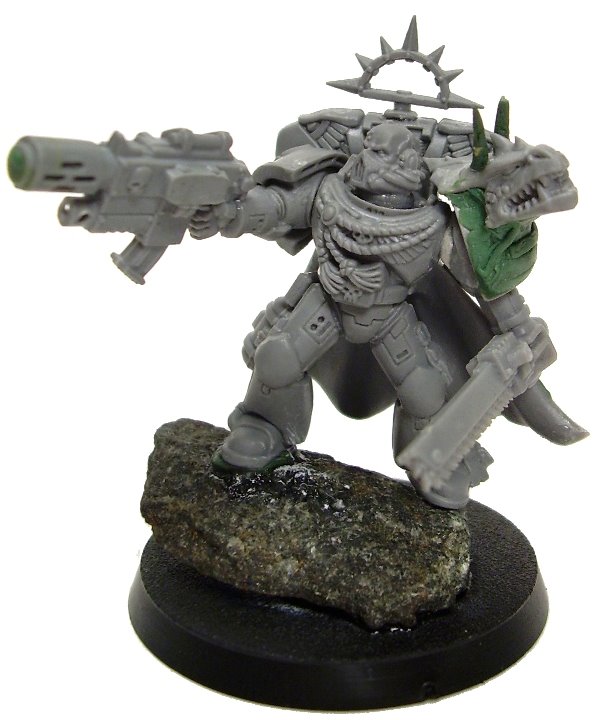
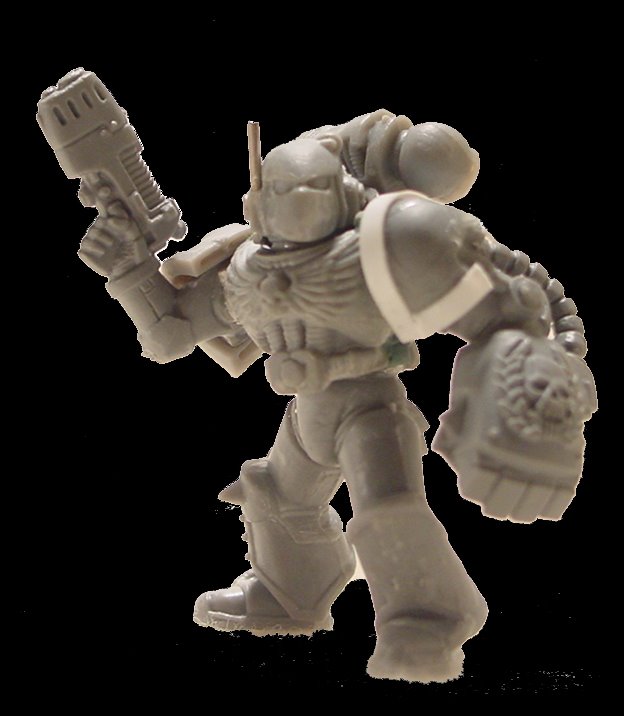
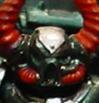
The Second Marine was a simpler build. I used Chaos marine legs because of the studded armor band on the greeves I took a beaky head and carved down the nose so it was more of a mouth guard then a beak. Out come of that was to create something that bore a resemblence to Optimus Prime. I used a terminator power fist with some plasticard lining around the pad. I used a bit of wire for an antenna on the right side of head.


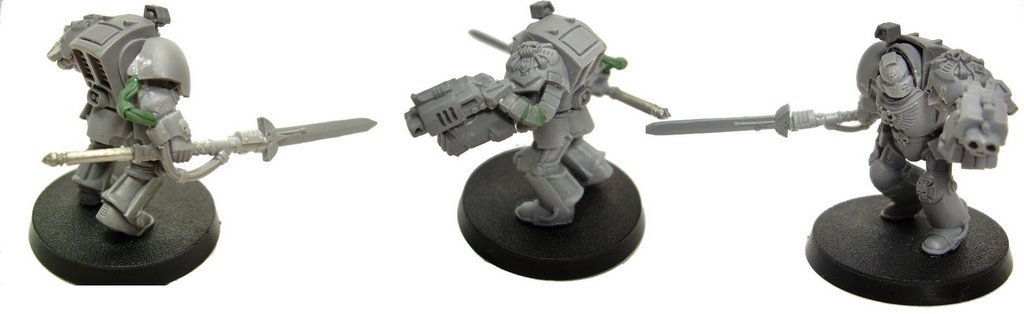
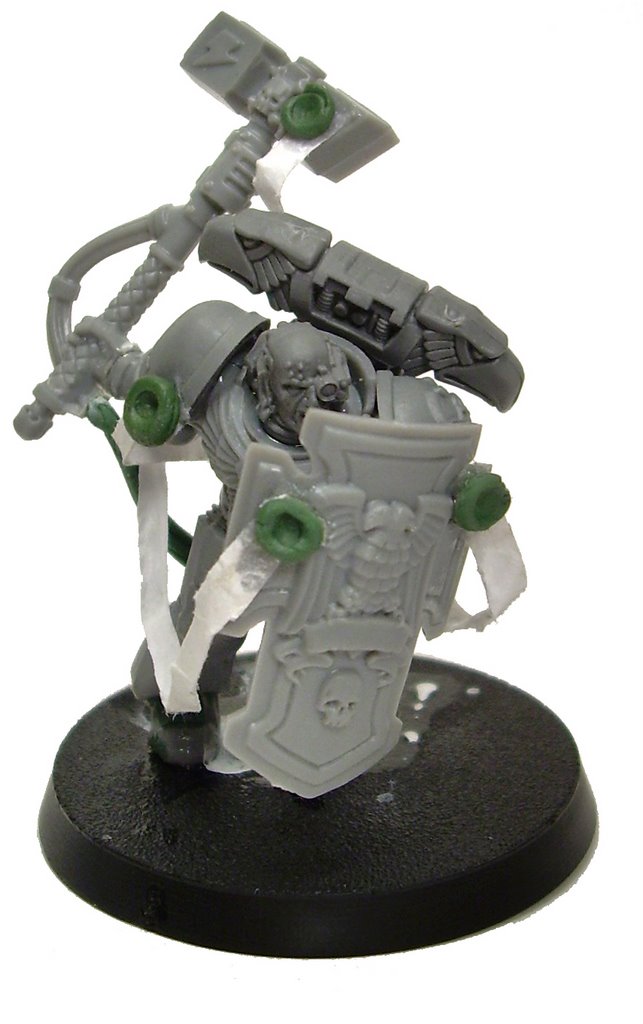
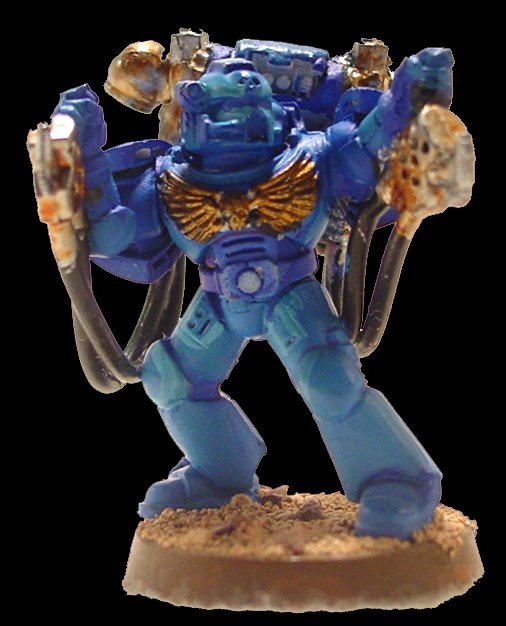
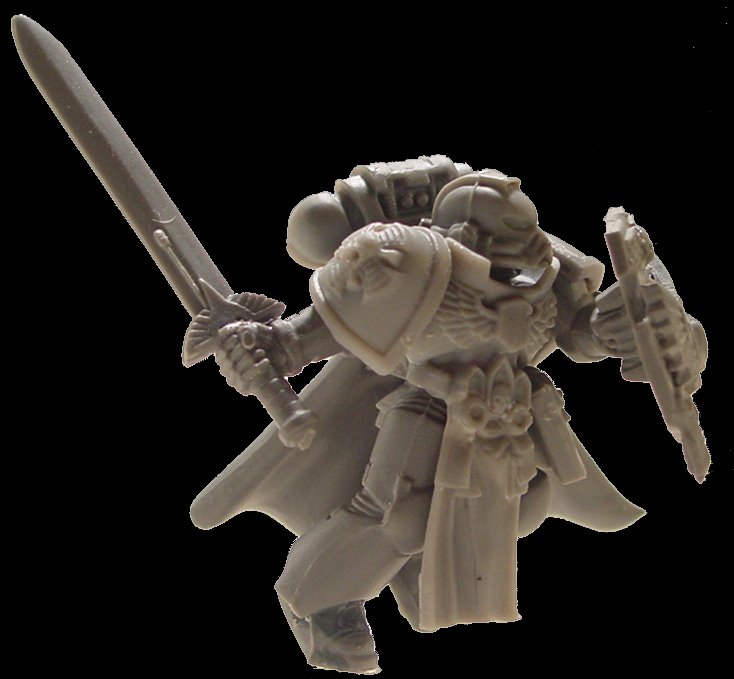
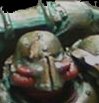
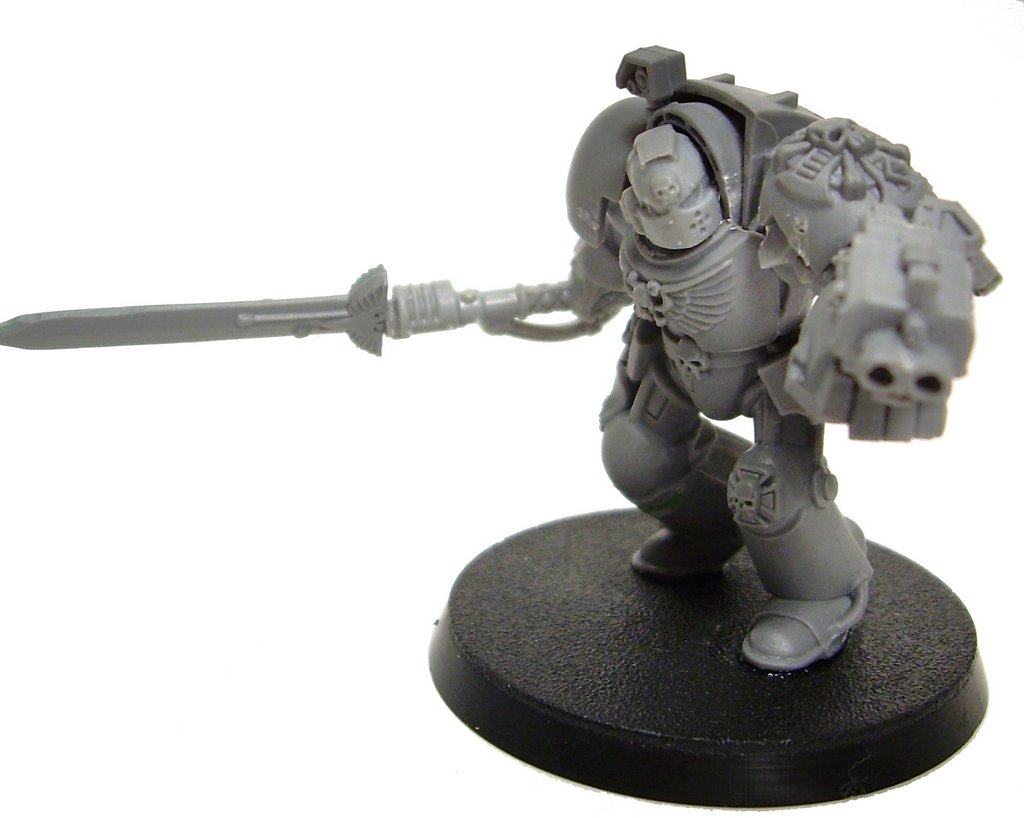
The third marine was a bit of a Templar inspired peice of work. Using a set of running marine legs, I created the image of a charging maring. I used the Company Champion Torso and bent the tabard a bit to carry on the idea of the charging marine. Coupled with the cloak from the Marine Commander turned out to be blessing as I repositioned a bolter arm to hold the Champion sword at a ready charge angle to give the impression he was charging head long into the enemy lines ready to decapitate the first poor enemy he came across.
Using the shield from the assault marine sprue I was able to compleate the requisite to equip a company champion with a shield.
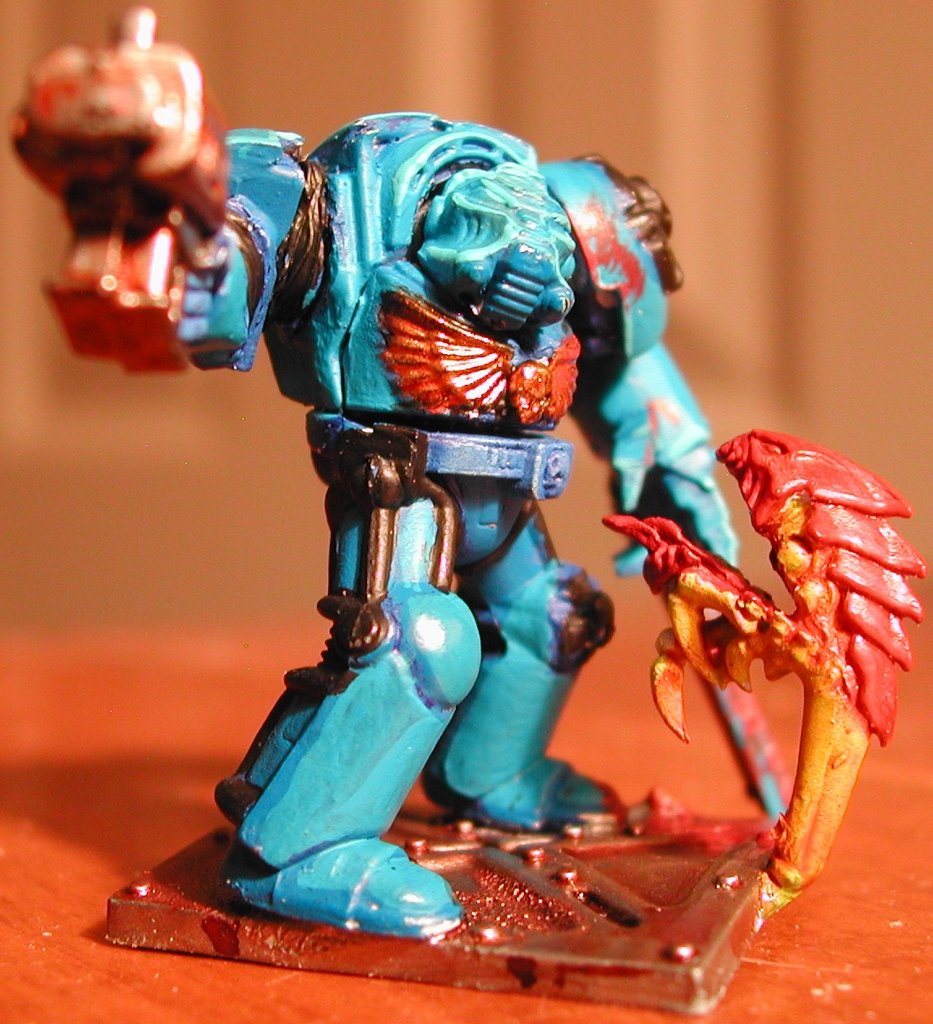
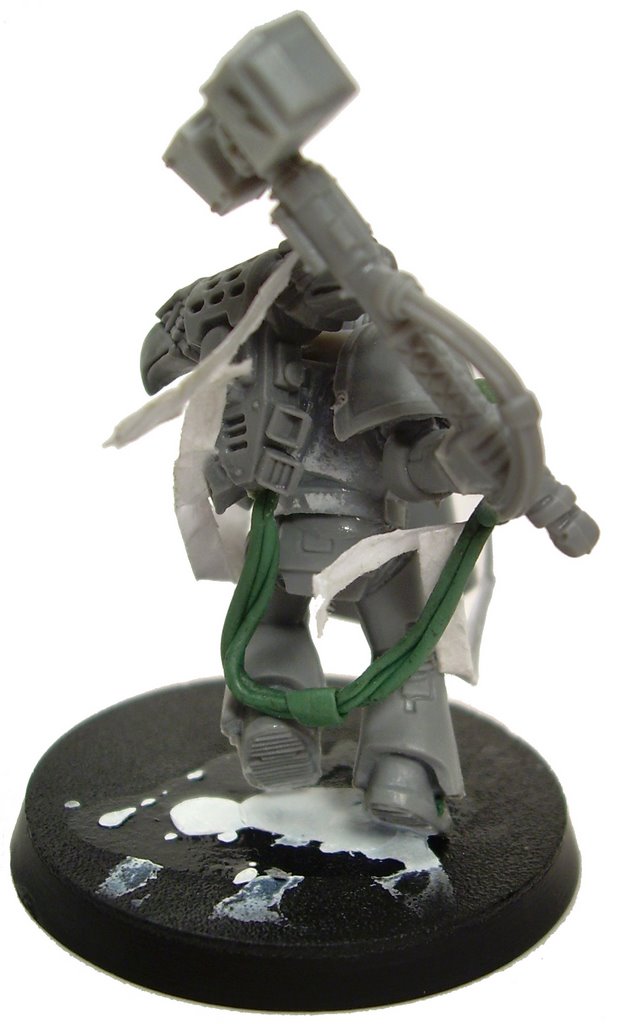
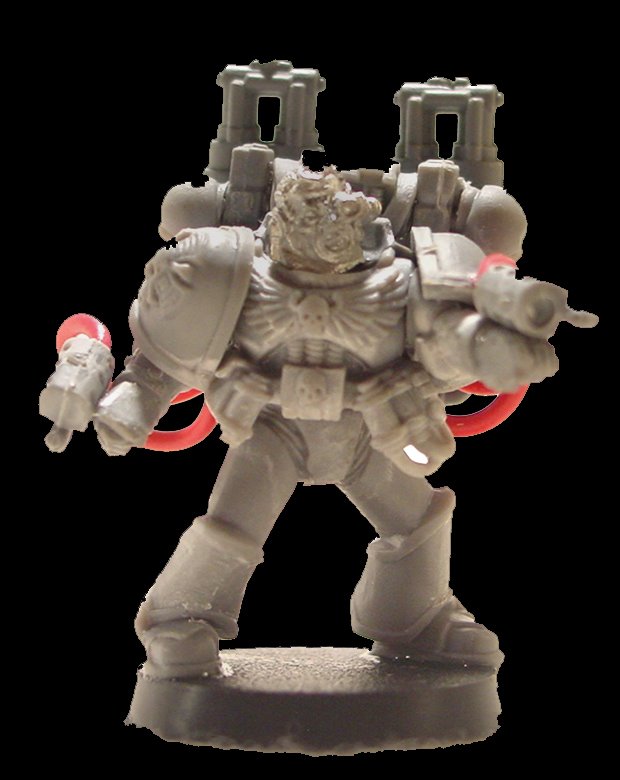
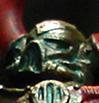
Sunday, September 03, 2006

Raptor Champion!

Aspiring Champion.
This was one the one I wanted to look mean and menacing. And what do loyalist marines, or just about anyone else, hate a lot? Lightning claws! There had been an artical in a recent issue of white dwarf where a modeler had built a Khorne champion in Terminator armor and used the fingers from the Talon of Horus for the lightning claws. They looked sooo supremly wicked! I needed that weapon style for this guy! So after much cutting, shaving, checking, recutting, re-checking, pinning, gluing, and removing the claws from my finger tip (twice!) I finally set the finished claws to the side to dry for a few hours. I went to work on the body.
Agian returning the Assault Marine sprue for legs, I took the last set. Using a few peices of plasticard I put in some plating to differentiate the armor from the typical marine armor. Perhaps it had been reworked by an artificer at some point. I chose the chaos torso with the chainmail tabard (Yes a common theme with chaos champions) but found that to carry the illusion of a vision killing zooming in on his next kill, I need to bend the tabard slightly so that it would bend up as if being thrown back by wind.
I assembled the back pack as a seperate unit, so that I put it to the side and give it time to dry. The only modification I made the wings was to bend then back slightly to give the impression that they were arching down into another powerful flap propelling the dreaded champion forward in his blood lust. Finally I was able to assemble the champion into the dreaded killer that he is!

Raptor ascendent!


It's always been my vision of the Chaos armies (with the exception of maybe the Thousand sons) that there's agreat deal of treachery and betrayal in the lines of the army. Now that's gotta start somewhere. Seems logical that that would with a Chaos Marine who's a little to arrogant for his own good. Hence the "God Ascendent" stand with this marine. By bending the wings, forward slighyly I present the image of downward flaps as the marine casually floats down from the hell spawn skies. The rest of the model is pretty straight forward.
A set of marine jumping legs, regular Chaos Torso, horned helmet. Bolt pistol arm and Chain sword. Boom, he's done.

Chaos Raptors, Charge!

Having done two seperate retreating raptors, I wanted a model that showcased a Raptor's deadliest asset, speed! I envision a winged marine skimming across the ground, scantly a meter above the rock, sooming from point of cover to point of cover but not quite ready for the attack blow. Unlike the previous Raptors, I started with the body on this one.
Agian using the legs from assault marines, I angled the chaos Marine torso up relative to the legs. I have the shave the back of the head slightly so that the head would sit further back and give the appearence that the marine was looking ahead almost parallel to the body. To create impression of speed, I cut off the top knot of hair and turned it to that it blew back wards.
The wings were actually simple work. A little pinning, a little glue, some green stuff and the wings were done. It was about this point that I realised I had paid the points for a plasma pistol in the squad, but I hadn't modeled it into the squad yet, so this guy got the fire power for the squad.
Raptor 3: Finished

Raptors/Possesed Marines Continues


Seeking inspiration for daemon winged creatured I sought out imagry on the internet. I came across several images that I liked (and that I later would find out were from Devil May Cry on the Play Station). Spreading out the wings wide, I created a menacing, yet tactical retreating look to this marine. I very much wanted to create a similar appearence to Raptor Number 5, with the retreating yet preparing to attack look. This on is slightly more of the retreating then of the attacking, yet he carries a bolt pistol ready to deliver vengence at those that have angered him. Using jumping Space Marine legs agian gave me the added bonus of, not only giving the impression of flight, but also giving the idea that the marine was kicking or jumping despite the fact he was flying.
For the curious observer, yes the chainsword is at different angles. I originally pined the army so the sword was across the chest in a momentary stance of protection.

Raptor/ Possesed Marine 4: Finished.

Chaos Raptors Continued


Continuing the work on my Raptors/ Possessed Marines, I'm now going to post break down of each raptor/marine seperatly.

First up, is the last of the line Raptor/Marine number 5. Each of the raptors I made were characterised by the Dark Pegesus Wings that have formed out of the characteristic respirator packs of the marines. For this particular marine, I wanted to present the image that he was dodging enemy fire and then quickly changing direction to charge at the offending attacker. Given the size of the wings relative to the rest of the model, they would be central to the image, and so I worked through several means to envision where the wings would be given the action I wanted to convey, where the joints in the wings would be, where the tips of the wings would be, the whole nine yards.
In the end, I settled on having the wings primarially swept forward to carry the emphasis that the marine was flying backwards. I then swept the right wing in toward the model to give the idea that he was changing direction while flying backwards.
From this point it was a simple means to build the rest of the model. Using a pair of jumping legs from the Assault Marines sprue, I created the proper slying look. By using the aiming bolt pistol arm from the chaos space marine spure, coupled with an out turned chainsword arm, I was able to forge an assaulting marine stance. Finally, I added a head and placed it so that it was aiming along the for arm.

Raptor 5: Finished.

Chaos Raptors

A few months back I happened to glance upon a set of dispatch paper-work for the local Games Workshop© Hobby Center. One of the headings caught my eye. "Submissions needed for White Dwarf", now if you don't know what White Dwarf is, I would suggest you go find a different blod to read. But I quickly read the rest of the information under the heading and found that a future issue of White Dwarf was in need of additional submissions for Flying models.
Having recently begun work on a Night Lord Chaos Army, I immediantly began thinking what kinds of "flying units" Night lords could use. Obviously the answer is Raptors. So I started work on raptors. But at some point, I actually looked at the Raptor entry and realised that in order to field them effectivly, it costs you about 35-40 points per model for the basic Raptor. Start looking at the aspiring Champion for upgrades and such, and you're talking 50 points for him if not more. But you can take Possessed Marines, give 'em Daemonic Flight which make's 'em 33 points a peice and you get Strength 5, Leadership 10. so I Started figuring models to represent both Raptors and Possessed Marines.